Evolution Wigs... created in collaboration with clients who have alopecia, this line of human hair wigs represents years of research, investment and testing. Understanding the unique needs and preferences of women with complete hair loss is what makes the Evolution wig collection so exceptional. Easi Wigs has put together specific information on how to measure and customise the Jon Renau Evolution collection of wigs.
To view the full range of Jon Renau Evolution wigs -
Click Here
Prep & Style
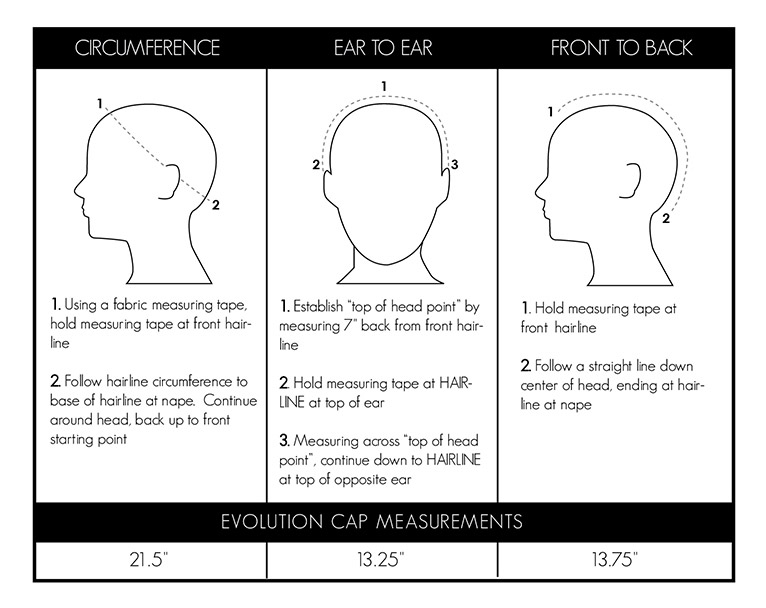
1. Measure your head according to the measuring guidelines. The Evolution cap is designed for a petite / average head size. It is very important that your cap fits well.
2. Put on the wig and pull the hair into a ponytail. Clip any shorter layers if necessary. Check that the ear tabs are level and that the lace front is centered. Use a tracing pencil to mark where you want to cut the hairline on the Swiss lace front. If any areas of the polyurethane need altering, also mark them at this point in time.
NOTE: The polyurethane and lace front are the only areas of the cap to be cut.
Customise Hairline
3. Remove the wig and turn it inside out. Use your Jon Renau Pinking Shears to cut the Swiss lace front along the line you marked earlier. Be sure to line up the blades as you trim to ensure an even pattern.
4. If needed, use regular scissors (sharp, short bladed scissors are best) to cut carefully along the markings on the polyurethane. Make sure to pull the hair away as you cut the polyurethane.
5. Use a damp cotton swab to gently remove any markings left from your Jon Renau Duo Tracing Pencil.
6. Place your wig onto your head to check the alterations. Be sure the lace front matches your natural hairline. If you need to make a second adjustment, repeat Steps 2-5.
Apply Adhesive
7. Remove the wig from your head; be sure your skin and the cap interior are clean and free of oils or makeup. Adhesive strips can be cut to a desired shape and size using small scissors. Apply red adhesive strips to the polyurethane and blue adhesive strips to the lace front.
8. Remove adhesive strip backings and gently put the wig on your head. Check to make sure the wig is in the correct position before applying pressure to the adhesive strips. When the wig is centered and in the correct position, gently press on each strip from the outside of the wig and hold for 10 seconds. Finish any minor styling if needed.
Remove Wig
9. To remove your wig, pull the hair back into ponytail or clip it back from the hairline. Lightly mist 2-3 pumps of Lace Release onto a cotton swab. Rub the cotton swab under the cap at the temples where adhesive strips are applied and gently lift. Release both sides before releasing adhesive on the lace front.
10. Once the adhesive strips have been released at the temples, gently slide the cotton swab underneath the lace front, starting at the outer corners. Be careful NOT to pull or stretch the lace. Continue gently rubbing the cotton swab underneath the adhesive strip until it completely releases. Remove the wig from your head.
11. Peel adhesive strips from the cap interior and discard. Mist 2-3 pumps of Lace Release onto a small area of a paper towel to clean off any excess adhesive on the cap interior. Gently wipe off excess Lace Release before storing the wig.
12. We recommend washing and completely drying your wig every 6-8 wears, and always before long-term storage.
 Cart
(
Cart
(